Key Takeaways
- Learn to safely replace broken garage door cables with our step-by-step guide
- Understand the warning signs of worn cables before they snap completely
- Discover when to call professionals versus tackling the repair yourself
- Find out which tools you need for a successful cable replacement
When your garage door refuses to open or close properly, a broken cable is often the culprit. This guide will walk you through everything you need to know about how to fix garage door cable issues safely and effectively. With the right approach, you can save money while ensuring your door functions properly for years to come.
Understanding Garage Door Cables and Their Importance
Garage door cables are critical components of your door system, working in tandem with springs to lift and lower what is likely the heaviest moving object in your house. These sturdy metal cables transfer the tension from the springs to actually lift the door, making them essential for smooth operation.
When a garage door cable snaps or comes off the drum, your door can become dangerously unbalanced or completely inoperable. Understanding how these cables function will help you better diagnose and fix problems when they arise. Cables typically last several years, but regular use eventually leads to wear and tear that necessitates replacement.
The cables run from the bottom bracket on each side of the door up to the cable drum, which is attached to the torsion spring system above the door. As the door moves, the cables wind and unwind around these drums, providing the controlled force needed to lift and lower your door safely.
Warning Signs Your Garage Door Cable Needs Attention
Before your garage door cable completely fails, it often gives several warning signs that trouble is brewing. Catching these early can save you from a complete breakdown and potentially dangerous situation.
Fraying or Visible Wear
Inspect your cables regularly for signs of fraying or wear. If you notice even small strands beginning to break, this indicates that the cable is weakening and will eventually snap. This deterioration typically happens gradually, giving you time to replace the cable before complete failure.
Uneven Door Movement
When one cable begins to fail, your garage door may appear crooked or move unevenly during operation. If you notice one side of the door seems to lag behind the other side during opening or closing, this could indicate a cable problem.
Unusual Noises
Strange sounds during operation often signal trouble with your garage door components. Grinding, scraping, or popping noises might indicate that a cable is slipping off the drum or beginning to fray against other parts.
Loose Cables
If your cables appear slack or loose when the door is in the closed position, this suggests they’ve stretched over time or have come partially detached from their mounting points.
Door Falls Rapidly or Won’t Stay Open
Perhaps the most dangerous sign is when your door begins to fall faster than normal or won’t stay in the open position. This indicates that the cables are no longer properly supporting the door’s weight.
Tools Needed to Fix Garage Door Cable
Having the proper tools before starting this repair will make the job significantly easier and safer. Many homeowners already own most of these tools, but some specialized items may need to be purchased.
Essential Tools for Cable Replacement
- Winding bars: For adjusting spring tension safely
- Adjustable wrench: For loosening and tightening various bolts
- Locking pliers: To secure the door and components in place
- Ladder: To reach the cable drums and upper mechanisms
- Safety glasses: To protect your eyes from potential debris
- Work gloves: To protect hands from sharp cable ends and pinch points
- Socket set: For removing and reinstalling various hardware
- Cable set: Replacement cables matching your door’s specifications
Optional but Helpful Tools
- C-clamps: Additional security for holding the door in position
- Tape measure: For ensuring proper cable length and positioning
- Lubricant: To ensure smooth operation after repair
- Flashlight: For better visibility in darker garage areas
- Vice grips: Alternative for securing components firmly
Having the right tools not only makes the job easier but significantly improves safety. Using makeshift tools like screwdrivers instead of proper winding bars can be extremely dangerous when working with high-tension springs.
Safety Precautions: Read Before You Begin
Working with garage door cables and springs can be dangerous if proper precautions aren’t taken. The torsion springs store enormous energy and can cause serious injury if mishandled.
Before attempting to fix your garage door cable, ensure you understand these critical safety measures:
First, always disconnect the garage door opener by unplugging it or pulling the emergency release cord. This prevents accidental activation of the door while you’re working on it.
Second, never attempt to adjust or repair the torsion spring unless you have specific training. The spring tension can cause serious injury or even death if released improperly. While cable replacement can often be done without adjusting the springs, if spring adjustment is needed, call a professional.
Third, secure the door in place before beginning work. Use locking pliers on the track just below a roller to prevent the door from unexpectedly moving up or down. For additional security, use C-clamps on the tracks or have someone help hold the door.
Fourth, wear appropriate safety gear including work gloves and safety glasses. The ends of broken cables can be sharp, and metal components can sometimes break or shatter under tension.
Lastly, never put your fingers between rollers, cables, or other moving parts, even when the door appears secure. Always maintain awareness of pinch points where injury could occur.
Step-by-Step Guide to Fixing Garage Door Cable
1. Preparation and Assessment
Before touching any components, take time to properly assess the situation. Determine if only the cable needs replacement or if other components like pulleys or the cable drum show signs of wear.
Start with the door in the closed position if possible. This position puts the least tension on the system and makes it safer to work on. If your door is stuck in a partially open position, secure it thoroughly with clamps or locking pliers before proceeding.
Take photos of the existing setup with your phone before disassembly. This provides a reference for how everything should look when you’re reinstalling components.
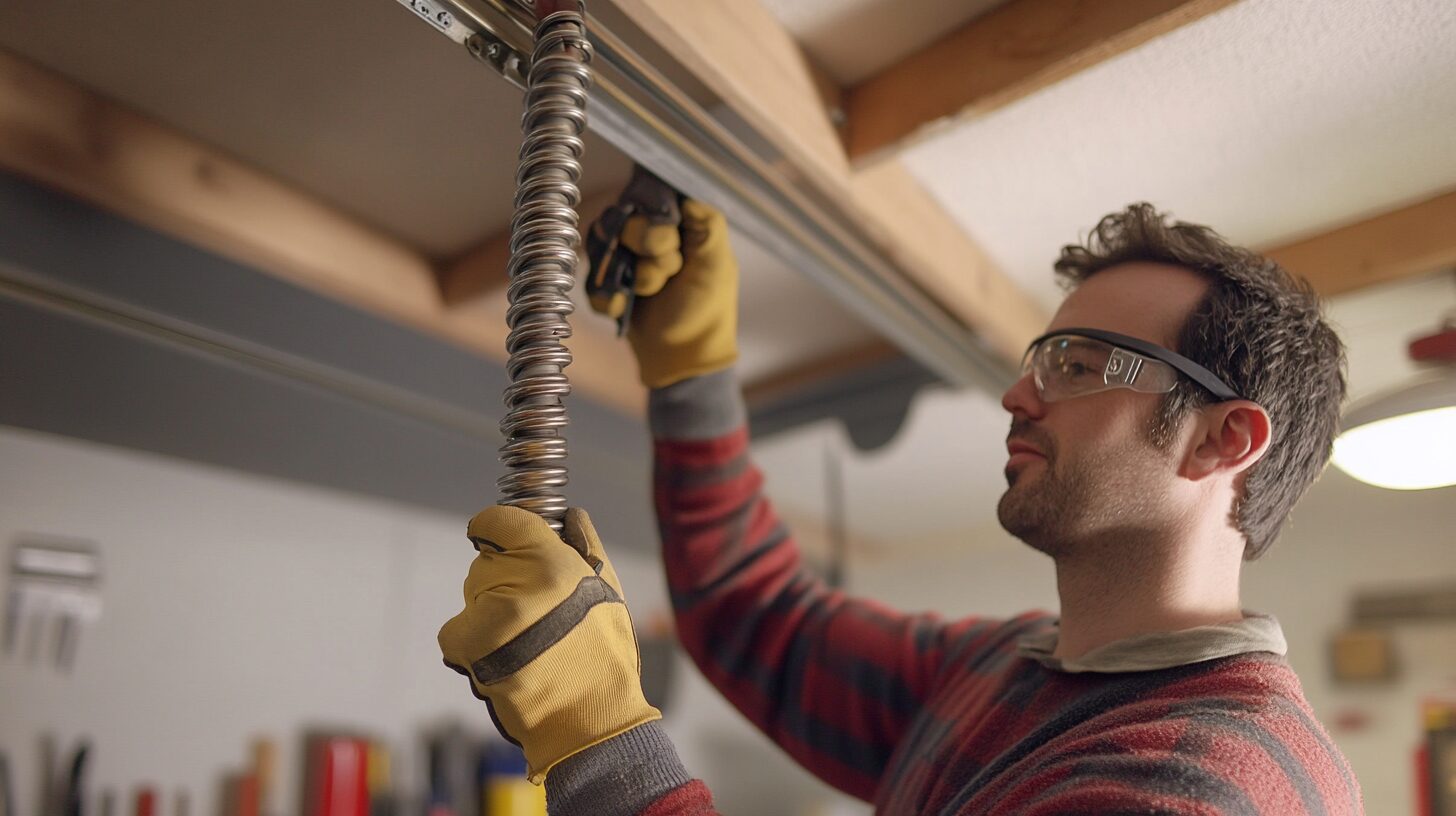
2. Relieving the Spring Tension
If your garage door uses torsion springs (mounted horizontally above the door), you’ll need to carefully relieve the tension before replacing the cables.
To do this safely:
- Insert a winding bar into one of the winding cone holes.
- Hold the bar firmly and loosen the set screws on the winding cone.
- Carefully use the winding bar to unwind the spring, quarter turn by quarter turn.
- After each quarter turn, insert the second winding bar into the next hole.
- Remove the first bar and repeat until all tension is released.
For extension springs (mounted on either side of the door tracks), disconnect the safety cable and unhook the spring from the bracket and pulley.
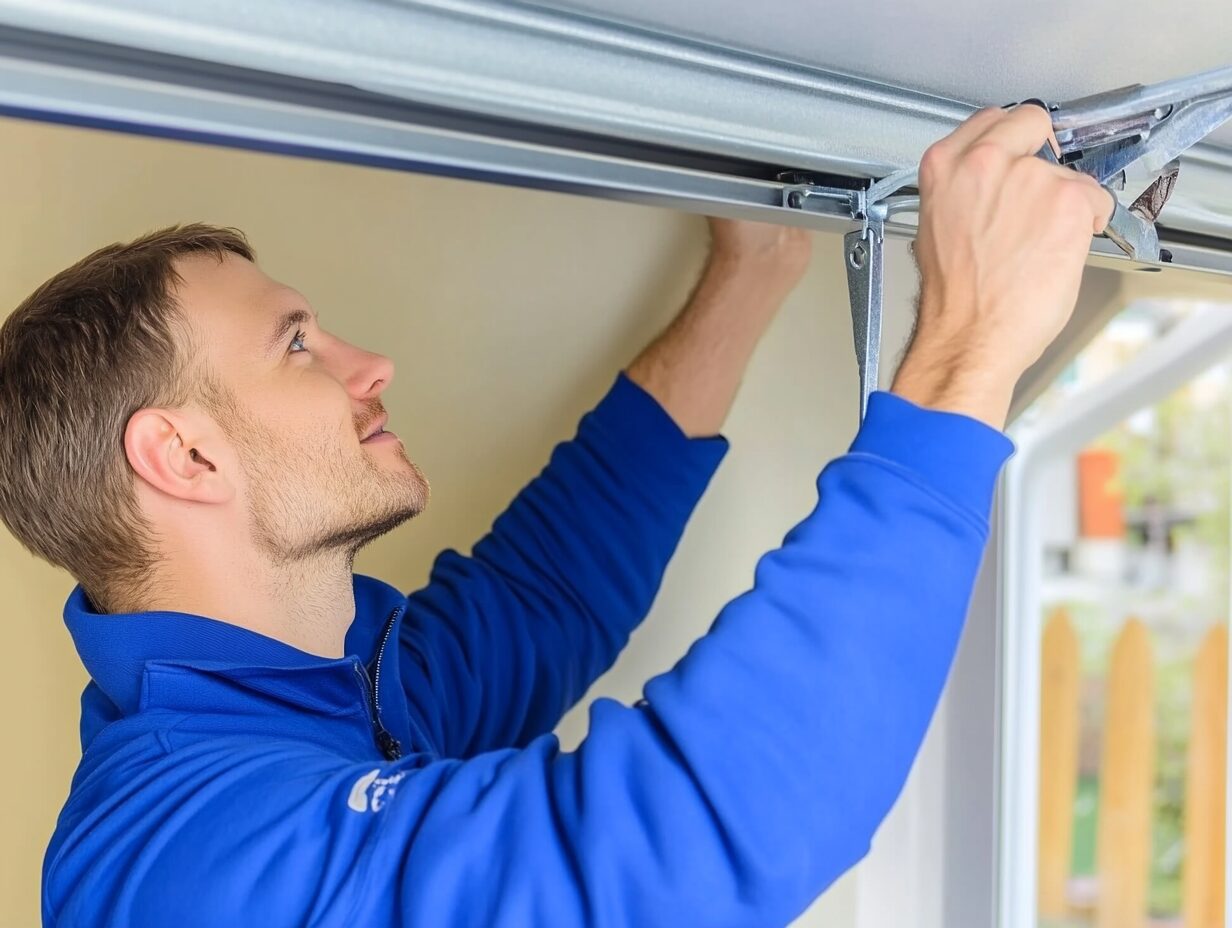
3. Removing the Old Cable
Once the spring tension is fully released:
- Loosen the set screws on the cable drum.
- Detach the old cable from the bottom bracket on the door.
- Carefully remove the cable from the drum.
- Inspect both the drum and bottom bracket for any signs of wear or damage.
4. Installing the New Cable
Installation is essentially the reversal of removal:
- Attach the new cable to the bottom bracket.
- Run the cable up to the drum, ensuring it sits in the proper groove.
- Wind the cable around the drum, making sure it’s tracking correctly.
- Tighten the set screws on the drum to secure the cable.
5. Balancing the Tension
For proper door function, both cables need to have equal tension:
- Ensure the door is level and both cables have similar tension when connected.
- Adjust the cable length at the bottom bracket if necessary.
- Check that the drums on both sides are positioned identically.
6. Restoring Spring Tension
Once the cables are properly installed:
- For torsion springs, use the winding bars to re-wind the spring.
- Turn the spring in quarter-turn increments, inserting the second bar before removing the first.
- Tighten the set screws on the winding cone when proper tension is achieved.
- For extension springs, reattach to the pulley and bracket, then reconnect the safety cable.
7. Testing the Repair
After completing the installation:
- Manually open and close the door several times to ensure smooth operation.
- Check that the door stays in place when stopped halfway.
- Listen for unusual noises that might indicate remaining problems.
- Reconnect the garage door opener and test the automatic operation.
Common Mistakes to Avoid
When fixing garage door cables, certain errors can lead to poor performance or safety hazards. Here are the most common mistakes to avoid:
Using the wrong length cable can cause improper door balance. Always measure your old cable or consult your door’s specifications to ensure you purchase the correct replacement.
Failing to secure the door adequately before beginning work can result in unexpected movement and potential injury. Always use locking pliers or clamps to hold the door in position.
Mismatched tension between sides creates uneven operation. Both sides should have equivalent cable tension for the door to operate smoothly.
Improper winding of the cable around the drum leads to tracking problems. Ensure the cable sits properly in the drum grooves and winds consistently.
Forgetting to check other components while doing the repair wastes an opportunity. While replacing cables, inspect pulleys, brackets, and other parts for wear that might cause future problems.
The Relationship Between Cables and Garage Door Springs
Understanding the interplay between cables and garage door springs is crucial for effective repairs. These components work together as a system, with the springs providing the counterbalance force and the cables transferring that force to actually lift the door.
Garage door springs store potential energy when the door is closed and release it to help lift the heavy door when you open it. The cables attach to the bottom of the door and run up to the cable drum, which are connected to the springs. As the springs unwind, they rotate the drums, which pull the cables and lift the door.
There are two main types of garage door springs you might encounter: torsion springs and extension springs. Torsion springs are mounted horizontally above the door opening and twist to create tension. Extension springs are installed on either side of the door and stretch to create tension. Each type works slightly differently with the cables, but both rely on cables to transfer their energy to the door.
If you have a broken garage door spring, you’ll likely need to replace the cables as well. This is because the sudden release of tension when a spring breaks often damages the cables. Even if the cables appear intact after a spring failure, they may have been stretched or weakened and should be replaced as a precautionary measure.
Similarly, if you have a broken one—whether it’s a cable or spring—it’s wise to replace both the left and right components as a pair. If one side has failed due to age or wear, the other side is likely close behind. Replacing both sides ensures balanced operation and reduces the likelihood of another failure soon after your repair.
When to Call a Professional
While replacing garage door cables is within the capabilities of many homeowners, certain situations warrant professional assistance.
If your garage door uses a torsion spring system and you’re uncomfortable working with high-tension springs, it’s best to call a professional. Working with these springs without proper knowledge can be extremely dangerous.
Similarly, if your door is particularly heavy or oversized, the increased tension and weight make the job more hazardous. Commercial-grade doors especially should be serviced by professionals.
If you notice significant damage to multiple components beyond just the cables, comprehensive repair might be needed. A professional can assess the entire system and make all necessary repairs simultaneously.
When your door has unusual or custom features, professional technicians will have the specialized knowledge required for proper repair.
Finally, if you begin the repair and encounter unexpected complications or feel unsafe at any point, don’t hesitate to stop and call for professional help. Safety should always be your primary concern.
Cost Considerations: DIY vs. Professional Repair
One of the main reasons homeowners consider fixing garage door cables themselves is to save money. Understanding the potential costs involved can help you make an informed decision about whether to DIY or call a professional.
For a DIY approach, you’ll need to purchase replacement cables, which typically cost between $15-$30 for a pair depending on quality and length. If you don’t already own the necessary tools, winding bars alone can cost $20-$40, and additional tools might be required. Therefore, your total DIY cost could range from $35-$100 for a basic cable replacement.
Professional garage door repair services typically charge between $150-$300 for cable replacement, with the price varying based on your location, the complexity of your door system, and whether additional repairs are needed. While this is certainly more expensive than the DIY approach, it includes the expertise and safety that comes with professional service.
Consider also the value of your time and the potential costs of injury or property damage if something goes wrong during a DIY repair. Sometimes paying a professional is the more economical choice when all factors are considered.
If your cable issues are accompanied by problems with garage door springs, pulleys, or other components, the repair becomes more complex and potentially more expensive. A complete overhaul of a garage door system by professionals might cost $500-$800, but would typically include new springs, cables, pulleys, and a service warranty.
For those who decide to hire professionals, Royal Garage Doors offers competitive pricing and experienced technicians who can quickly and safely resolve your garage door cable issues, often completing repairs in a single visit.
Maintaining Your Garage Door Cables for Longevity
After successfully replacing your garage door cable, proper maintenance can significantly extend the life of the new components.
Perform monthly visual inspections of all cables, looking for signs of wear, fraying, or rust. Early detection of problems prevents more serious failures later.
Keep the cables clean by gently wiping them with a dry cloth occasionally to remove dust and debris that could accelerate wear.
Lubricate the pulleys, but not the cables themselves, with a silicone-based lubricant. This reduces friction at contact points where cables run through pulleys.
Check tension regularly to ensure the cables remain properly adjusted. Loose cables can jump off the drum, while overly tight ones experience excessive wear.
Finally, maintain the entire door system by lubricating hinges, rollers, and tracks, and by testing the balance periodically. A well-maintained door puts less stress on all components, including cables.
Conclusion
Successfully learning how to fix garage door cable issues empowers you to maintain one of your home’s most frequently used features. By understanding the function of cables, recognizing warning signs, and following proper replacement procedures, you can safely address this common garage door problem.
Remember that safety should always be your primary concern when working with garage door components, particularly those under tension. If at any point you feel uncomfortable with the repair process, don’t hesitate to contact a professional.
Regular maintenance and prompt attention to minor issues can prevent the inconvenience and potential hazards of a completely broken door. With proper care, your newly repaired garage door should provide reliable service for years to come.
By handling this repair yourself, you’ve not only saved money but gained valuable knowledge about an important home system. The satisfaction of completing such a practical repair adds to the reward of a properly functioning garage door.