How to Clean and Maintain Garage Door Weatherstripping

Royal Garage Doors has customer feedback on its Etobicoke Google profile and technicians with hands-on experience installing and repairing doors across Toronto and the wider GTA.
How do you clean and maintain garage door weatherstripping?
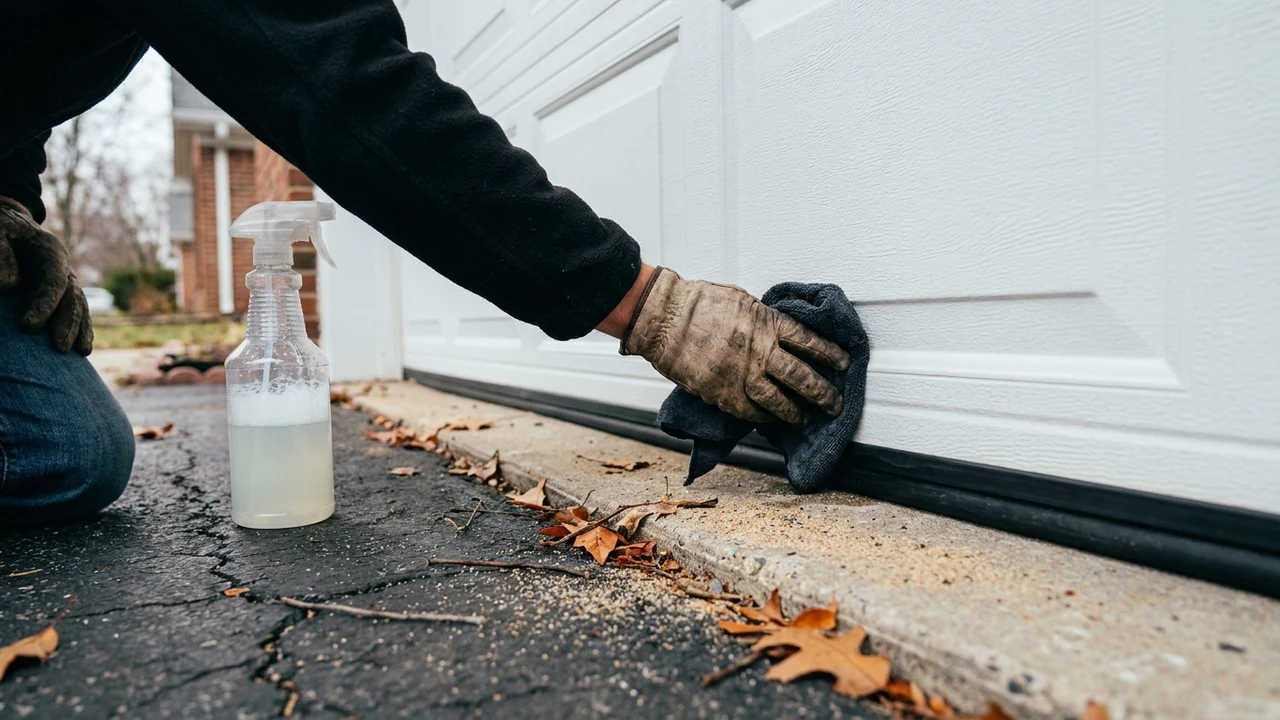
To clean garage door weatherstripping, brush off loose dirt, then wipe the bottom and side seals with a rag dipped in warm water and mild dish soap — never a petroleum-based cleaner, which dries out and cracks the rubber. Royal Garage Doors recommends cleaning twice a year; a cracked or flattened seal needs replacing at $120–$260, not cleaning.
How often should I clean my garage door weatherstripping?
Twice a year is enough for most GTA homes: once in fall before road salt season starts, and once in spring to remove salt residue that dried on the rubber
- Customer feedback
- Read our Google reviews (Etobicoke profile)
- Experience
- Garage door service across the GTA
- Repair warranty
- 1-year parts and labour unless a specific written warranty overrides it
- Author
- Royal Garage Doors, Garage door repair and installation
What weatherstripping actually does on a garage door
Three separate rubber seals do this job, not one. The bottom seal is the bulb- or T-shaped strip that sits in an aluminum retainer track along the bottom edge of the door and presses against the concrete floor. The side seals (sometimes called stop molding) run up both jambs where the door meets the frame. The top seal runs across the header. Together they're the only thing standing between your garage and outside air, rain, snowmelt, and whatever a raccoon or mouse decides to try to squeeze under at 3 a.m.
Because the bottom seal touches pavement every single time the door opens and closes, it takes by far the most abuse and needs the most attention. The side and top seals mostly just need dirt kept off them.
How to clean it: the routine that actually works
You don't need anything specialized. A stiff-bristle brush or a shop vac to knock off loose debris first, then a rag with warm water and a few drops of mild dish soap. Wipe the full length of the bottom seal, the retainer track it sits in, and both side seals. Rinse with a damp cloth and let it air dry before closing the door.
- Do: mild dish soap and warm water, a soft brush for caked-on dirt, and a dry cloth to finish.
- Don't: use gasoline, WD-40, degreasers, or any petroleum-based cleaner on the rubber — they strip the plasticizers out of it and make it crack faster, not slower.
- Don't: point a pressure washer directly at the seal's edge. It can peel the bulb right out of the aluminum retainer track, and then you're dealing with a door that won't seal even though the rubber itself was fine.
If the rubber feels dry or slightly stiff after cleaning but isn't cracked, a light coat of silicone-based rubber conditioner (not silicone spray lubricant meant for hinges — a dedicated rubber conditioner) helps keep it flexible. This is optional, not required, and it's the one product step that actually extends the life of an otherwise sound seal.
Don't forget the track and the threshold
The aluminum retainer track the bottom seal sits in collects grit, small stones, and leaf debris that get pressed into the seal every time the door closes. If you only wipe the rubber and never clear the track itself, you're cleaning half the problem. Run a flat screwdriver or a stiff brush along the track's channel to knock out anything wedged in there before you wipe the seal down.
The GTA-specific reason bottom seals fail early
In Toronto and the GTA, road salt and sand tracked in on tires all winter are the single biggest reason bottom seals wear out faster than side or top seals. Salt residue dries the rubber out and accelerates cracking, and sand acts like sandpaper every time the door closes on it. If your garage floor slopes toward the door or catches runoff from the driveway, that effect is worse.
This is also why a bottom seal that looks fine in July can be cracked and leaking by March — the damage happens gradually over a winter of salt exposure, and you usually don't notice until the seal is already failing.
When to clean it: twice a year, timed around winter
| Timing | Why |
|---|---|
| Fall (before first snow) | Clear summer dirt and check the seal is intact before it has to fight salt and sand all winter |
| Spring (after the thaw) | Remove dried salt residue that's been sitting on the rubber for months and inspect for winter cracking |
Twice a year is enough for most GTA homes. If your garage backs onto a ravine, faces a lot of blowing leaves, or you park a salt-covered vehicle in it all winter, a quick wipe-down once a month between the two full cleanings isn't overkill.
The test that tells you clean vs. replace
This is the part most homeowners skip, and it's the one that actually matters. Dirt washes off. A seal that's failing doesn't come back with soap and water, and no amount of cleaning fixes rubber that's already broken down.
- The pinch test: squeeze the bottom seal between your fingers. If it flexes and springs back to shape, it's still doing its job. If it feels stiff, stays creased, or crumbles slightly, it's brittle and past cleaning.
- The flashlight test: at night, close the door and have someone shine a flashlight along the outside bottom edge while you stand inside with the garage lights off. Daylight or light gaps mean the seal isn't sealing anymore, whether or not it looks dirty.
- The visual check: look for cracks running along the length of the rubber, flat spots where it's lost its bulb shape, or sections pulling loose from the retainer track. Any of these mean replacement, not another cleaning.
Side and top seals are usually more forgiving since they don't touch the ground, but the same rule applies — if you can see daylight around the door frame when it's closed, cleaning won't close that gap.
What replacement costs when cleaning isn't enough
Weatherstripping replacement — bottom seal or side seals, depending on what's worn — runs $120–$260 + tax, and the cost depends mainly on door size and which seals need replacing. It's a straightforward job: the old seal pulls out of the track, the new one gets fed in and trimmed to length. The service call itself is free with the repair.
It's worth doing sooner rather than later. A gap under the door doesn't just let cold air in — it's an open invitation for mice, and every degree of heat loss from a bad seal shows up on your winter heating bill, especially if your garage is attached and shares a wall with living space.
Royal Garage Doors recommendation
Clean your weatherstripping twice a year with mild soap and water, keep petroleum-based products away from the rubber, and run the pinch and flashlight tests before you assume a dirty-looking seal just needs a wipe-down. If the rubber is cracked, flattened, or letting light through, cleaning won't fix it — Royal Garage Doors has been doing seal replacements across the GTA and has customer feedback on our Etobicoke Google profile. You can see current weatherstripping pricing on our pricing page, or use the price calculator to estimate your job before you book. Ready to get it fixed before the next cold snap? Book a seal replacement — the service call is free with any repair.
Related reading: Getting Your GTA Garage Door Ready for Fall.
Frequently Asked Questions
How often should I clean my garage door weatherstripping?
Twice a year is enough for most GTA homes: once in fall before road salt season starts, and once in spring to remove salt residue that dried on the rubber over winter. Garages that see heavy leaf debris or a lot of blowing sand can benefit from a quick wipe-down once a month in between.
Can I use WD-40 or a silicone lubricant spray on garage door seals?
No. WD-40 and most spray lubricants are petroleum-based and strip the plasticizers out of rubber weatherstripping, which makes it crack and go brittle faster, not slower. Stick to mild dish soap and warm water, and use a dedicated silicone-based rubber conditioner only if the seal needs extra flexibility after cleaning.
Why does the bottom seal wear out faster than the side seals?
The bottom seal is the only part of the weatherstripping that touches the ground, so it takes the full brunt of road salt, sand, and grit tracked in on tires all winter. Salt residue dries out the rubber and sand acts abrasively every time the door closes, which is why bottom seals typically need replacing well before the side or top seals do.
How much does it cost to replace garage door weatherstripping?
Weatherstripping replacement runs $120–$260 plus tax depending on door size and whether it's the bottom seal, side seals, or both. The service call itself is free when it's done as part of a repair.
How do I know if my seal just needs cleaning or needs to be replaced?
Pinch the rubber between your fingers — if it flexes and springs back, it's still good and just needs a wash. If it stays creased, feels stiff, or crumbles, it's brittle and cleaning won't fix it. You can also close the door at night and check for daylight or gaps along the bottom edge with a flashlight from outside; any light getting through means it needs replacing.
Sources & standards: Garage door safety follows the UL 325 standard for automatic operators. For safe manual operation, see Chamberlain's emergency-release guidance. Pricing reflects current Royal Garage Doors rates for the GTA.
The bottom line: done right, the result is a garage door that opens quietly, balances correctly and is safe to use every day — backed by Royal's 1-year labour warranty so the outcome lasts.