How to Adjust Garage Door Opener Travel Limits

Royal Garage Doors has customer feedback on its Etobicoke Google profile and technicians with hands-on experience installing and repairing doors across Toronto and the wider GTA.
How do you adjust garage door opener travel limits?
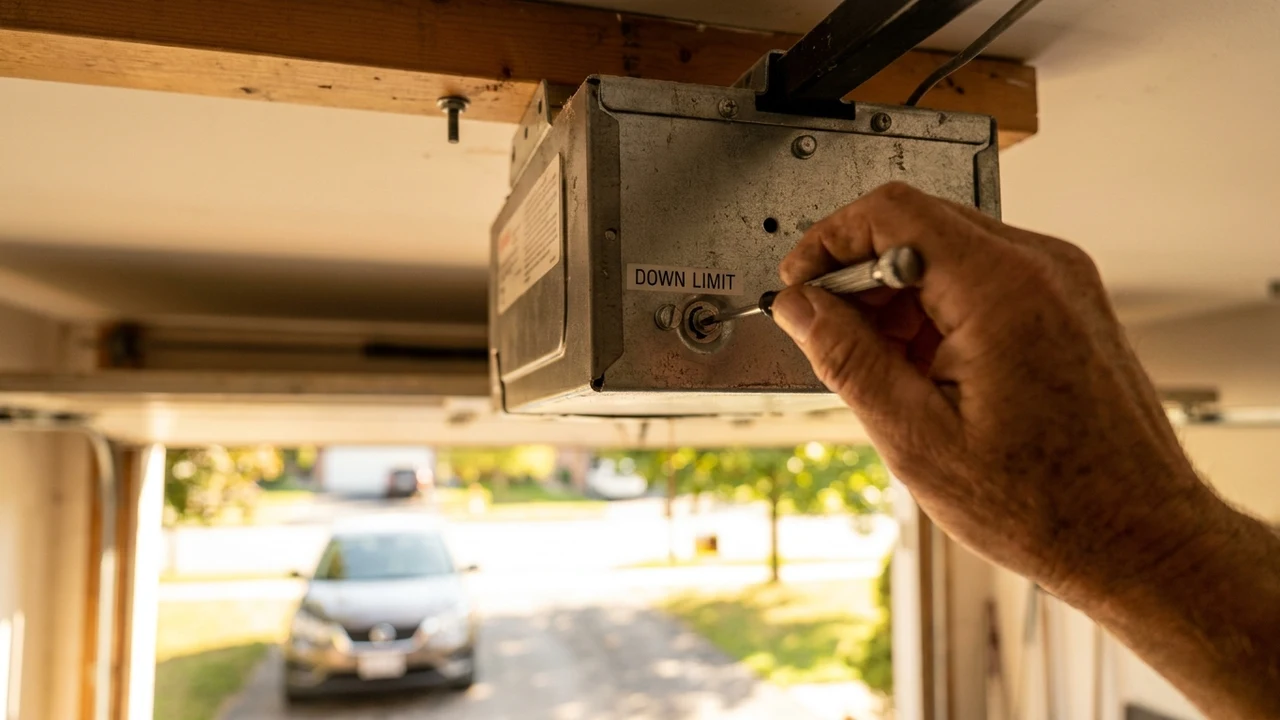
To adjust garage door opener travel limits, use the up-limit and down-limit screws or the Limits button on the motor unit to set exactly where the door should stop when fully open and fully closed. Royal Garage Doors sees this most often when a door reverses just before touching the floor.
What's the difference between travel limits and force settings on a garage door opener?
Travel limits tell the opener exactly where fully open and fully closed are positioned. Force settings control how much power the motor uses to get there. They interact: a wrong
- Customer feedback
- Read our Google reviews (Etobicoke profile)
- Experience
- Garage door service across the GTA
- Repair warranty
- 1-year parts and labour unless a specific written warranty overrides it
- Author
- Royal Garage Doors, Garage door repair and installation
What travel limits actually control
Every garage door opener has two travel limits programmed into its logic board: the up-limit, which tells the trolley where "fully open" is, and the down-limit, which tells it where "fully closed" is. These are separate from the force settings, and separate from the safety sensors. Travel limits are pure position memory — they tell the motor exactly how far to run in each direction before it should stop.
When the limits are set correctly, the door opens all the way without slamming into the header, and closes flush against the floor without the opener straining against a door that's already stopped. When they're off, even slightly, you get one of two problems: a door that won't travel far enough, or a door that travels too far and fights the frame.
The two symptoms that point straight at travel limits
Before you touch anything, confirm the problem actually matches a limit issue and not something else:
- Door stops short of the floor, or reverses right before it touches down: the down-limit is set too high, so the opener thinks the door is closed before it actually is. This is the single most common travel-limit complaint we get calls about in Mississauga and Etobicoke.
- Door doesn't open all the way, or the opener strains and reverses near the top: the up-limit is set too low.
- Opener runs but the door barely moves, or moves in tiny jerks: that's not a limit problem — that's almost always a broken or weakening spring carrying none of the door's weight. Don't touch the limits; book a spring inspection instead.
- Door closes, then immediately reverses back open on its own: check the safety sensors first (wipe the lenses, confirm the LEDs are steady). If the sensors are clean and aligned and it still happens, then look at the down-limit.
Travel limits and force settings are not the same adjustment
This is where most DIY attempts go wrong. A lot of openers — especially older LiftMaster and Chamberlain chain-drive units — have travel limits and force settings as two separate dials or menu steps, and they interact with each other. If the down-limit is set too far into the ground (past where the door physically stops), the opener has to apply extra force to keep pushing, which can trip the force setting and make the door reverse — a symptom that looks exactly like a bad sensor or a bad limit, when it's actually both settings fighting each other.
The practical rule: adjust the travel limit first, in small increments, and only touch the force setting afterward if the door still isn't closing with proper force after the limit is correct. Cranking the force up to compensate for a wrong limit is how people end up with a door that closes hard enough to hurt someone or something underneath it — which defeats the entire purpose of the safety systems built into the opener.
Finding the limit adjustment on your opener
The physical location changes by brand and by how old the unit is. As a general guide:
| Opener type | Where to look |
|---|---|
| Older chain-drive (LiftMaster/Chamberlain, pre-2010s) | Two small screws on the back of the motor housing, labelled "UP" and "DOWN" or marked with arrows |
| Newer belt/chain-drive with a keypad on the unit | A "Limits" or "Travel" button on the motor housing, used with the wall control or a learn button |
| Smart/myQ openers | Adjusted through the same physical buttons on the unit, though some models expose a limit-adjust step in the myQ app during setup |
| Side-mount / jackshaft openers | Limit adjustment is usually set during installation via the control board and rarely needs owner adjustment — if it's off, that's a setup issue worth a technician visit |
If you don't see labelled screws or a button, check the owner's manual for your exact model number before guessing — every manufacturer places these differently, and a lot of the how-to videos online show a unit that doesn't match what's on your ceiling.
How to adjust the limits, step by step
The general sequence is the same across most residential openers, even though the exact button presses vary by model:
- Unplug the opener or switch off power at the breaker before you start. You'll be working near the trolley and rail.
- Identify which limit is wrong: run the door and watch exactly where it stops short or where it strains.
- Locate the up/down limit screws or the Limits button (see the table above).
- Make a small adjustment — a quarter to a half turn on screw-type limits, or one short press on button-type limits. Small increments matter here; a full turn can overshoot badly.
- Restore power and run the door through one full open-close cycle to check the result.
- Repeat in small steps until the door opens fully without straining and closes flush against the floor without reversing.
If you're three or four small adjustments in and the door still isn't landing right, stop. That usually means something mechanical is off, worn rollers, a bent track, or a spring that's no longer balanced, and no amount of limit-tweaking will fix a mechanical problem.
The safety test you cannot skip after adjusting
Any time you change the down-limit, you've changed how hard and how far the door travels toward the floor. That makes the auto-reverse safety test mandatory, not optional, every single time:
- Lay a 2x4 flat on the floor in the door's path (or a full roll of paper towels for a quicker version of the same test).
- Close the door and let it contact the object.
- The door must reverse immediately on contact. If it doesn't, the force and down-limit combination is unsafe and needs to be backed off right away.
- Separately, confirm the photo-eye sensors still trigger a reversal when you wave something through the beam while the door is closing.
This isn't a formality. A door that doesn't reverse on contact is a door that can close on a car bumper, a pet, or a person, and that's exactly the failure mode these adjustments exist to prevent. If the reversal test fails after you've adjusted the limits and backed off the force setting, stop adjusting and call a technician rather than continuing to guess.
When to stop and call a technician
A few situations are worth a professional visit instead of continued DIY adjustment:
- The door still won't hold a consistent stopping point after several careful adjustments — often a sign of a slipping gear or a logic board losing its memory.
- The opener is more than 10-12 years old and the limit screws feel stripped or won't hold their setting.
- The reversal test fails even after you've corrected the limit and eased off the force.
- You hear grinding or see the trolley chattering on the rail during travel — that's a mechanical issue, not a settings issue.
An opener repair visit covering gear kits, logic boards, or limit and force recalibration runs $120-$550 depending on what's actually wrong, and the service call itself is free with any repair. If the opener is old enough that repeated adjustments keep drifting, a new belt-drive or chain-drive unit installed and programmed runs from $600, which is often the better long-term call than chasing a worn-out board every few months.
Royal Garage Doors recommendation
Travel limit adjustments are one of the few opener fixes a careful homeowner can do safely, as long as you make small changes and never skip the reversal test afterward. But if the door keeps drifting out of adjustment, if the force and limit settings seem to be fighting each other, or if you're not confident the safety reversal is working every time, that's exactly the kind of call our techs handle across Mississauga, Etobicoke, and the rest of the GTA every week. We'll diagnose whether it's the limits, the force setting, or a mechanical problem underneath both, and fix it the same visit. See current pricing for opener repair and replacement, or book a visit — the service call is free with any repair.
Related reading: Why Your Garage Door Reverses the Instant It Touches the Floor.
Frequently Asked Questions
What's the difference between travel limits and force settings on a garage door opener?
Travel limits tell the opener exactly where fully open and fully closed are positioned. Force settings control how much power the motor uses to get there. They interact: a wrong down-limit can force the opener to push harder than it should, tripping the force setting and making the door reverse unexpectedly.
Why does my garage door reverse right before it touches the floor?
This is almost always a down-limit set too high, meaning the opener thinks the door is fully closed before it actually reaches the ground. Adjust the down-limit screw or button in small increments and retest after each change.
Is it safe to adjust garage door travel limits myself?
Yes, with care. Make small adjustments, unplug the opener before reaching near the trolley, and always run the 2x4 reversal test after any change. If the door doesn't reverse immediately on contact, stop and call a technician rather than continuing to adjust.
How much does it cost to fix garage door opener travel limits if I can't do it myself?
An opener repair visit, which covers limit and force recalibration along with checking gears, sensors, and the logic board, runs $120-$550 depending on the cause. The service call itself is free with any repair.
Can wrong travel limits damage my garage door opener?
Yes. A down-limit set too far can force the motor to keep pushing after the door has already stopped, straining the gears and belt or chain over time. An up-limit set too far can cause the trolley to slam into the header repeatedly, which wears out the drive system faster than normal use.
Sources & standards: Garage door safety follows the UL 325 standard for automatic operators. For safe manual operation, see Chamberlain's emergency-release guidance. Pricing reflects current Royal Garage Doors rates for the GTA.
The bottom line: done right, the result is a garage door that opens quietly, balances correctly and is safe to use every day — backed by Royal's 1-year labour warranty so the outcome lasts.